With the roof on and the rain no longer coming in from above, it is time to stop the rain coming in sideways - by cladding the external walls. The flooring is a waterproof chipboard, the manufacturers specify it can take the weather for 90 days. However it had been about 30 and already there were tell tale signs of swelling on the joins. Nothing that a light sand wouldn't fix, but it sure was a good time to cover the wall frames.
On the subject of weather, try not to build a house in winter hey! Unfortunately that was the most convenient time with work, so winter it had to be. The days are very short, it is cold, it rains a lot. The area is not too windy which is a bonus, but you'll be needing a nice oilskin jacket and broad rimmed hat to keep the rain out while you work in it.
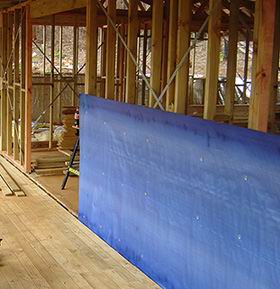
Wrapping building paper...
To further draftproof and waterproof the house, you wrap it with building paper. Siselation, or wall sarking it is usually referred to as, one side is waterproof "breathable" plastic, the other side is coated in a thin aluminium foil for a bit of insulation quality. Careful with it, the aluminium flakes off if you manhandle it!
A simple job - start at a door on the bottom, unroll the paper and bash in some of those gang nails to hold it in place for now. A second row a bit higher with some overlap and you are done. Cut out the windows once complete!
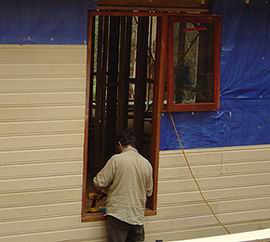
For some reason I thought the windows would be really tricky to put in, even though I had checked out the installation technique and on the surface it looked quite simple. Well, it turned out to be one of the easiest jobs yet!
Putting in windows.
Basically all the holes in the wall frames are bigger that the windows. Stand the window in the hole. Use some simple little brackets that slot into the aluminium window frame and connect to the wall frame. Hold your spirit level against it and make sure it is correct before putting a heap of brackets up.
The deck sliding door on the rear frame goes in the same way as the windows. The sliding door itself is a bit trickier, but not hard. Tip: install the sliding door panel before you install the fixed glass panel! ;)
Front door, bit of mucking around
- cladding on it's way!
On the otherhand, the front door took a lot of mucking around. The timber door jamb fits into the gap which gets (carefully) nailed into place. Ensure it is as square and plumb as possible. The door itself needed a fair bit of planeing down before it would fit neatly. This included putting a notch into the bottom for the weather strip to slot into when it was closed. Yeah, hanging doors is a fiddly job for an amateur, especially one only armed with a belt sander. Saw dust here we come!
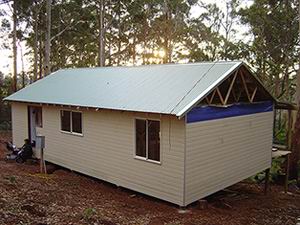
To get rid of the Big Blue House look, bang on your cladding. I opted for fibre cement planks. Doesn't have the same rustic charm as wooden boards, but is a whole lot more user friendly to install and maintain. Paint them and you'll get 10 if not 20 years of trouble free service, and they will only ever need to be painted again.
Wood on the other hand is going to need a lot more attention - warping, cracking, replacing dodgy planks and plenty of staining. It has its charm though...

On with the cladding.
Putting down the first row or two you need to ensure you have your spirit level handy. Once they are down, it's pretty hard to not keep it level. The planks I had just overlap each other up/down, and butt together with a little clip left/right. To be polyeurathane'd later.
Cutting the right length to fit between the corner profiles (installed first) is best done with a score'n'snap knife, about $10 from your local hardware. A heavy rasp file with clean up the dags. Around windows and doors it gets a bit trickier, I kicked up the angle grinder with a diamond blade on it. Lots of dust, it's probably bad to breathe in, you'd probably want some sort of mask if you were building mansion sized houses...
More cladding done.
The planks are 300 wide so it goes on pretty quick, 40mm clouts do the job holding it on. I was banging one in every slud towards the bottom where they overlap. Probably overkill, but that's been my plan so far ;)
Then, you start to go above your head, then higher. Worksafe Australia would have a fit. In the very top recesses I first tried a cunning plan to work inside out which dismally flopped. The Olde Man's "I'll hold the ladder, you take the piece up and bash it on" slow but steady method worked a treat. It is possible to carry a full length up a ladder, put it in place and nail it down by yourself. Just. You probably couldn't do it while juggling three tennis balls and balancing a beach ball on your nose though, so don't be in too much of a hurry.

Danger cladding.
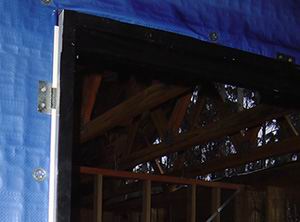
Trimming the cladding is tedious. Around the windows it's all good, there is a recess built in the aluminium frame which the cladding slots into about 20mm. The timer door jamb is fine as well, it gets covered over by an architrave. However, where the wall hits the rafters is another matter - you'll either have to lovingly notch around them, trim the area with bits of timber (called a "bird board") or put in a board under the eave.
At this stage, the house is locked up! From a casual observer point of view, it's a real house! Until they look inside though and its all timber frames, insulation and piled up junk ;)

A locked up house, yah! ;)