If you can get connected to scheme water, do it. If you can't, I'm quite fond of the humble rain water tank, and here's how to use one.
Three choices for getting water into yer taps: catch it off the roof into a tank, catch it off the ground into a dam, or put in a bore and suck it up. Nothin' quite like rainwater, so I went the roof/tank route.
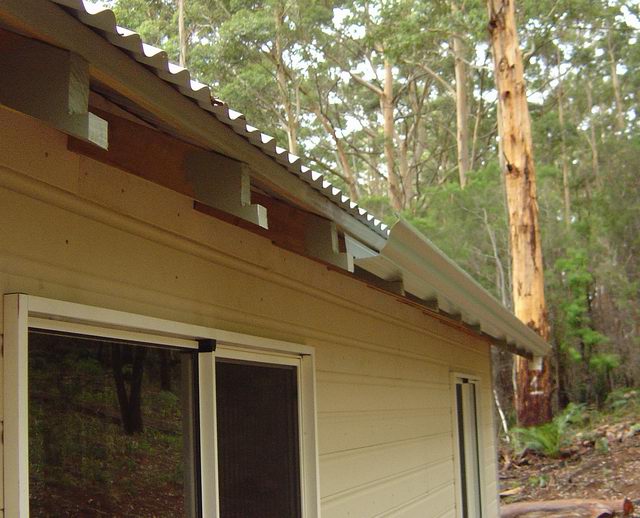
After-the-fact gutter attachment, urgh.
I created a 50mm run-off towards the
downpipe (at the far end).
Now as any roof plumber will tell you - in fact anyone who has a mate who knows a roof plumber will tell you - gutters go on first, roof sheets go on second. Through certain acts of fear and panic I neglected to put the guttering up first, "it can wait until I need it." Not the best idea, basically it turned what should be a few hours worth of work into two days of work, just for one side of the house! (For those wondering, no I didn't pop the sheets off to mount the gutter clips - I modified them and screwed them on horizontally through the ends of the rafters. A dab of silicone on the head of the screw and that'll have to do.)
There is a world of water tanks out there. Concrete, metal, lined, poly. Choose your size, choose your material, choose your cost. Size - bigger is better. A good size for a family is 100,000L. I was limited by flat space on the block, and by the hip pocket. Not to mention I wasn't planning on living there, so I opted for a 23,000L poly tank. In pretty green to match the roof. That is pretty much the biggest poly tank you'll get, looking at ~$AUD2200, delivered.
Delivery, heh, interesting experience. I had an area next to the house levelled with enough room for 2 tanks (future expansion, y'see), but to get the tank there was on the slope. The tanks come in one piece, the the top popped in, which was later popped out when in place with a blower!

"A big drink bottle".
The guy on the truck has no fear, but let me tell you when you are rolling a 5m diameter tank down a hill, when you look up, it seems to go on forever. I needed to have a little sit down after we "bounced" it off the truck onto a couple of old tyres. "Why don't we use a ramp?" ;)
Getting it into place was actually not too bad in the end. The delivery guy jumped in, bored out some holes for the tap and the overflow, put in the centre bracing, done. I then connected up the pressure pipe, note the dead-end T piece - for the next tank, should I need one.
(the pressure pipe screw fits into the gate value. However, once you glue the rest of the system in place, you can't unscrew it. I contemplated getting one of those left/right hand threaded removable sections in case I ever needed to modify the system; then came to my senses that for the number of times I predict I will need to modify it I can afford to replace the $10 worth of PVC bits.)
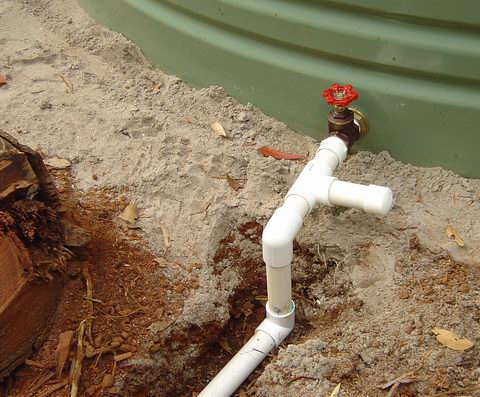
Gate value to house with future expansion in mind.
To catch water off the roof, the tank has to be lower than the gutter. To use the water in the house you either have to pump it up to a higher (smaller) tank and thus use gravity for pressure, or simply use a little pressure pump. This little guy was $AUD300, plenty 'nough pressure and flow for this house.
I believe the main cause of death for little pumps like these is running flat chat when there is no water to pump (ie, you forgot to turn the water valve on). Some models have water detection, flow detection. This little guy has a low low pressure cut out. Let me explain.
In normal operation, when the pressure hits "low", the pump starts until it hits "high". The yellow egg on top attempts to smooth the delivery of water so it isn't so stop-and-start. Now if after hitting low the pressure falls to "low low", something is wrong, most likely there is no water to pump. Stop pumping lest you burn yourself out!
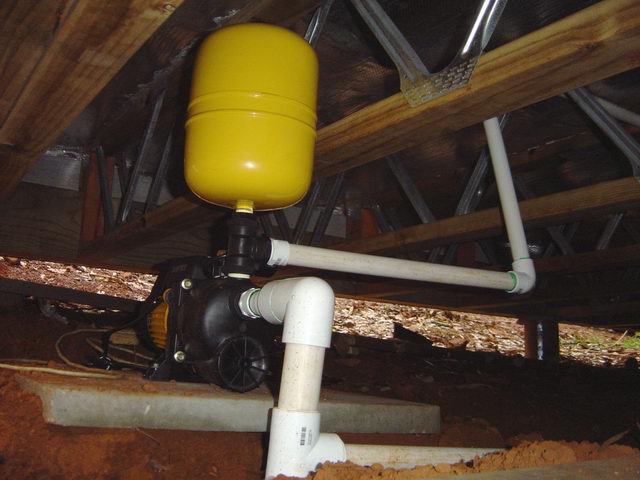
Pressure pump.
Ah, now you have a pump sitting there, powered up, refusing to do anything. On the side of the unit is an override switch. Fix the problem that caused the low low trip (ie, open the water valve ;)) and hold the override switch on. If all is well the pressure will pump back up past the low level; you can let go of the override switch we are back in auto operation.
Note that I have two feeds - a pipe that runs to the pressure pump, and a pipe that gravity feeds to the shed. I was thinking waaay back when I dug the trench to the shed - I put some 25mm pipe in the ground. By hooking it into the non-pressure side, and the fact the shed is about 4m lower than the tank, you don't need power to have a rather impressive flow of water at the shed. I'm thinking if you were fire-fighting, you don't want to have to rely on power to get your water!
The final part of the puzzle is getting the gutter water to the tank. There are+ two methods, the "wet" and the "dry". Wet means you go from the gutter to a downpipe, underground to the tank and back up into the tank. Nice visually, but you are left with water in the pipe all year round. Dry means from the gutter to the tank only going downhill - no water is ever left in the pipes.
I went dry, but there was scarsely enough slope over the distance to reach the tank; even with some angle iron strapped to the storm water pipe, it still bows under the weight of the water. So much for a dry system. If (and probably when) I connect up the other gutter I will be moving to a wet system - but I'll put a drainage elbow at the bottom.
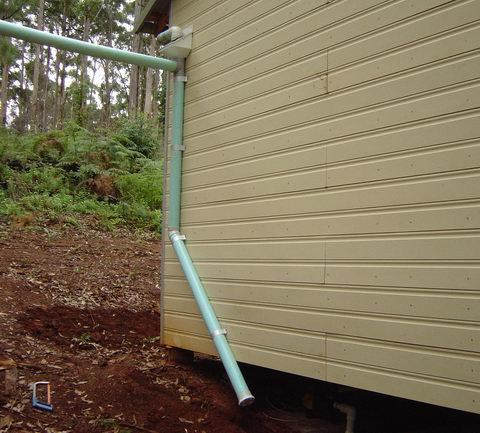
Leaf eater and first flush.
I put a "leaf eater" straight out of the system. The idea is that leaves hit the 45° screen and don't continue into the tank. A 1mm mesh is included at the bottom - basically there should no be any way that mosquitos can enter into the tank system. There is also a first flush system - the first water that comes off the roof fills up the first bit of pipe, then the rest of the water goes into the tank. On the end of the first pipe is a screw on lid with a small hole drilled in it - so it will empty when the rain stops, ready for the next rain. The idea is that the first bit of water off the roof is mucky with dust and stuff, don't put that into the tank.
Notice I deviated the end of the first flush pipe away from the footings of the house.
How long is it going to take to fill that tank? Well, do a quick calc. Yearly rainfall in Pemberton is around 1200mm, I have approximately 100m2 of roof collection area. Multiply them together and you get 120,000L, so, more than 5 times per year...
Right, enough of that, lets move on to plumbing the water around the house...